Welcome to our online store
New Products
Showing posts with label Blogging. Show all posts

Sunday, August 19, 2012

Listing post titles in alphabetical or chronological order

In this tutorial I will show you how to list the titles of your blog’s 1000 2000 most recent posts. If you are looking for an alternative to Blogger’s Archive gadget, then this might be it. This list can also be used as a Table Of Contents. This list is made possible with the use of Yahoo! Pipe.

See the demo in Blogger Sentral Widget Showcase.

The list comes with several options:

1. List them inside a widget or in a post static page.

2. Arrange the titles in alphabetical or chronological order. If you use your blog as an online serial novel, then chronological order is just what you need.

3. Append (or not) a comment count at the end of each title.

4. Choose numbered or bulleted list style.

Let’s get started,
 <script type="text/javascript">
var d = new Date();
var time = d.getHours();

if (time < 10) {
document.write("<b>Good morning</b>");
} else {
document.write("<b>Good day</b>");
}
</script>

Use this option if you want to put the list on a separate page. (You can then access it via a tab.)

1. Create a new page by going to Posting > Edit Pages and clicking the New Page button.

2. Click Edit HTML tab to switch to HTML mode.

3. Copy and paste the code into the editor.

4. Click Post Options at the bottom of the editor. Under the Edit HTML Settings heading, select Ignore newlines.


5. Publish and view your post . The list should appear inside the page.

6. Then add a link to the page from your homepage. This can be done by adding navigation tabs. If you have the page gadget installed, this is added automatically by Blogger.

7. If you want to remove the extras (sidebars, footer etc.) from the page, read Apply different layout/styling to static pages.

3) Put the list in a gadget

Use this option if you want to put the list on a sidebar, making it visible at all times.

1. Go to Design > Page Elements.

2. Click Add A Gadget link.

3. Select HTML/Javascript gadget.

4. Enter the title of your widget e.g. All Posts List.

5. Copy and paste the code inside the content box.

Replace http://www.bloggersentral.com (the value of YourBlogUrl) in code line 20 with your own blog URL. Do not include the trailing slash (as in .com/). Refer to step 4 for options/customizations.

Reminder: In the process of editing your code, never switch to Rich Text mode. Doing so will add line breaks (
) in your code, rendering the code useless.

6. Save and view your blog.


4) Customizing the list

Below are a few available customizations/options:

§ Listing order -the default order is alphabetical. To change to chronological order, just change the word alphabet in code line 21 to chrono.

§ Comment count - comment count is displayed by default. To remove comment count, delete code line 13.

§ List style -the default is bulleted list. To change to numbered list, replace ul (in line 4 and 16) with ol.

§ Style the list with the inline style attribute in line 4.

§ If your list becomes too long, you might want to put it in a scroll box


5) Editing the pipe (optional)

If you want further customize the widget output, you need to edit the (Yahoo) pipe itself. Follow the steps below:

1. Go to the Yahoo! pipe.

2. Log in to your Yahoo! account.

3. Create a clone by clicking the Clone button.

4. Click edit source to edit it in anyway you like.

5. When you’re done editing and saving, test run it by clicking Run Pipe button to confirm the output of the pipe.

6. To use your edited pipe, copy the pipe id and paste it to replace the existing id in line 22. (To get the id, look in your browser’s address bar. The id is the end part the URL when you are viewing or editing the pipe.)

Enjoy!

Add to Cart View detail

Wednesday, August 15, 2012

EXCLUSIVE CURSORS FOR BLOGGER


One of the best way to make your blog good looking and interesting is by changing the mouse cursor. Below are 15 exclusive cursors for blogger that can be applied to your blog. Today i will teach you how to change your cursor in blog. It's an easy method which a begginer blogger can also do.
Follow the Below steps:
  1. Login to dashboard.
  2. Go to Templates---> Edit Html.
  3. Tick on Expand Widget Templates.
  4. Find for </head> tag.
  5. Copy and paste any cursor from below above/before the closing </head> tag.


Cursor.1
<style type="text/css">body, a:hover {cursor: url(http://safir85.ucoz.com/bdlab-blogspot/Arrow_02.gif), progress;}</style><a href="http://blog-toolz.blogspot.com" target="_blank" title="Blogger Widgets"><img src="" border="0" alt="Blogger Widgets" style="position:absolute; top: 0px; right: 0px;" /></a>


Cursor.2
<style type="text/css">body, a:hover {cursor: url(http://safir85.ucoz.com/bdlab-blogspot/bluemultiglit.gif), progress;}</style><a href="http://blog-toolz.blogspot.com" target="_blank" title="Blogger Widgets"><img src="" border="0" alt="Blogger Widgets" style="position:absolute; top: 0px; right: 0px;" /></a> 


Cursor.3
<style type="text/css">body, a:hover {cursor: url(http://safir85.ucoz.com/bdlab-blogspot/tail2.gif), progress;}</style><a href="http://blog-toolz.blogspot.com" target="_blank" title="Blogger Widgets"><img src="" border="0" alt="Blogger Widgets" style="position:absolute; top: 0px; right: 0px;" /></a> 


Cursor.4
<style type="text/css">body, a:hover {cursor: url(http://safir85.ucoz.com/bdlab-blogspot/bounce.gif), progress;}</style><a href="http://blog-toolz.blogspot.com" target="_blank" title="Blogger Widgets"><img src="" border="0" alt="Blogger Widgets" style="position:absolute; top: 0px; right: 0px;" /></a> 


Cursor.5
<style type="text/css">body, a:hover {cursor: url(http://safir85.ucoz.com/bdlab-blogspot/apple-tmani.gif), progress;}</style><a href="http://blog-toolz.blogspot.com" target="_blank" title="Blogger Widgets"><img src="" border="0" alt="Blogger Widgets" style="position:absolute; top: 0px; right: 0px;" /></a> 


Cursor.6
<style type="text/css">body, a:hover {cursor: url(http://safir85.ucoz.com/bdlab-blogspot/aliendance.gif), progress;}</style><a href="http://blog-toolz.blogspot.com" target="_blank" title="Blogger Widgets"><img src="" border="0" alt="Blogger Widgets" style="position:absolute; top: 0px; right: 0px;" /></a> 


Cursor.7
<style type="text/css">body, a:hover {cursor: url(http://safir85.ucoz.com/bdlab-blogspot/banana-dance-ani.gif), progress;}</style><a href="http://blog-toolz.blogspot.com" target="_blank" title="Blogger Widgets"><img src="" border="0" alt="Blogger Widgets" style="position:absolute; top: 0px; right: 0px;" /></a> 


Cursor.8
<style type="text/css">body, a:hover {cursor: url(http://safir85.ucoz.com/bdlab-blogspot/Bird_3.gif), progress;}</style><a href="http://blog-toolz.blogspot.com" target="_blank" title="Blogger Widgets"><img src="" border="0" alt="Blogger Widgets" style="position:absolute; top: 0px; right: 0px;" /></a> 


Cursor.9
<style type="text/css">body, a:hover {cursor: url(http://safir85.ucoz.com/bdlab-blogspot/blackglitter.gif), progress;}</style><a href="http://blog-toolz.blogspot.com" target="_blank" title="Blogger Widgets"><img src="" border="0" alt="Blogger Widgets" style="position:absolute; top: 0px; right: 0px;" /></a> 


Cursor.10
<style type="text/css">body, a:hover {cursor: url(http://safir85.ucoz.com/bdlab-blogspot/cat-ani-brown.gif), progress;}</style><a href="http://blog-toolz.blogspot.com" target="_blank" title="Blogger Widgets"><img src="" border="0" alt="Blogger Widgets" style="position:absolute; top: 0px; right: 0px;" /></a> 


Cursor.11
<style type="text/css">body, a:hover {cursor: url(http://safir85.ucoz.com/bdlab-blogspot/fireblue.gif), progress;}</style><a href="http://blog-toolz.blogspot.com" target="_blank" title="Blogger Widgets"><img src="" border="0" alt="Blogger Widgets" style="position:absolute; top: 0px; right: 0px;" /></a> 


Cursor.12
<style type="text/css">body, a:hover {cursor: url(http://safir85.ucoz.com/bdlab-blogspot/Fly_2.gif), progress;}</style><a href="http://blog-toolz.blogspot.com" target="_blank" title="Blogger Widgets"><img src="" border="0" alt="Blogger Widgets" style="position:absolute; top: 0px; right: 0px;" /></a> 


Cursor.13
<style type="text/css">body, a:hover {cursor: url(http://safir85.ucoz.com/bdlab-blogspot/Halloween_2.gif), progress;}</style><a href="http://blog-toolz.blogspot.com" target="_blank" title="Blogger Widgets"><img src="" border="0" alt="Blogger Widgets" style="position:absolute; top: 0px; right: 0px;" /></a> 


Cursor.14
<style type="text/css">body, a:hover {cursor: url(http://safir85.ucoz.com/bdlab-blogspot/Heart.gif), progress;}</style><a href="http://blog-toolz.blogspot.com" target="_blank" title="Blogger Widgets"><img src="" border="0" alt="Blogger Widgets" style="position:absolute; top: 0px; right: 0px;" /></a> 


Cursor.15
<style type="text/css">body, a:hover {cursor: url(http://safir85.ucoz.com/bdlab-blogspot/horse-ani1.gif), progress;}</style><a href="http://blog-toolz.blogspot.com" target="_blank" title="Blogger Widgets"><img src="" border="0" alt="Blogger Widgets" style="position:absolute; top: 0px; right: 0px;" /></a> 

Add to Cart View detail

Fixed Position Independence Day/ Welcome Note/ Your Name etc BANNER For BLOGGER


It's time for another gadget to add some Independence Day cheers to your blog.In this post i have a stylish Happy Independence India Banner you can fix in the top right corner of your blog to greet your readers.The banner is transparent so it wont block your content and as the reader scrolls the banner followers them.A great simple way to wish your readers a Happy Independence Day.
Steps To Add This Stylish Banner To Blogger

Login to Your Dashboard.
Go to Templates >>Edit Html.
Find for </head>
Paste the below code there before </head>.

<style>
.independence {
position: fixed; top: 0%; right: 0%;
zoom:1;
-webkit-transition:all 0.3s ease-in-out;
    -moz-transition:all 0.3s ease-in-out;
    -ms-transition:all 0.3s ease-in-out;
    -o-transition:all 0.3s ease-in-out;

}
.independence:hover {
position: fixed; top: 0%; right: 0%;
zoom:1.3;
}
</style>
<img class='independence' title='Happy Independence Day To My Fellow Indians' alt="Blog Tips" src=" https://blogger.googleusercontent.com/img/b/R29vZ2xl/AVvXsEjJlo4yDVBe_AMuQKIGA2oFWpHsqJYHCdW0YX6fc-HgGG7f5cZfQ3dCTK37R2OnXUEiEWNxRieUdnS51bkplD63OVKjBErPU9PIrOQgtUC1IVrPdiguwLZt61Xt4Zpf3lsSRag2huW-Q8c/s218/happyindependenceday-1.png "/>


Now, click on Save the Template.
Add to Cart View detail

Tuesday, August 14, 2012

How To Remove Blogger Attribution Gadget

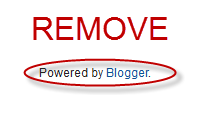
The Attribution gadget is the gadget in the footer that says "Powered By Blogger". If you have tried to remove this then you may of noticed this gadget is locked into you blog. To unlock it, follow the next steps:

Step 1. Log in to your Dashboard, go to >> Design >> Edit HTML

Step 2. Check the "Expand Widget Templates" box

Step 3. Search (CTRL+ F) for this code:


<b:widget id='Attribution1' locked='true' title='' type='Attribution'>

Step 4. Replace true with false


Step 5. Save Template

Now attribution gadget is unlocked and it can be removed. Just go to:


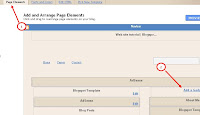
Design >> Page Elements, click on the edit link from Attribution gadget:


Then click on the Remove button - as you can see in the screenshot below:
Add to Cart View detail

How to Add Cool Floating Notification bar in Blogger

We already shared a floating notification bar for wordpress recently. Many of my readers request to create this floating notification bar for Blogspot/Blogger blogs and today we are sharing a simple yet Cool Floating Notification bar for Blogger. Its very easy to add this widget in blogspot. All you have to do is copy code given below, paste it in to your blog and customize text, link etc according to your needs. Isn’t that simple!


Add Cool Floating Notification bar in Blogger ! 
First Always Back Up Your Template Before You Any Make Changes – How To Back Up A Blogger Template
Goto Blogger => Design => Edit HTML
Next search for this code
    <body>

    Just below it paste the following code,

    <!-- Notification code start -->
    <style type='text/css'>
    #ut-sticky
    {
    background: #7d7e7d; /* Old browsers */
    background: -moz-linear-gradient(top,  #7d7e7d 6%, #7d7e7d 9%, #0e0e0e 99%); /* FF3.6+ */
    background: -webkit-gradient(linear, left top, left bottom, color-stop(6%,#7d7e7d), color-stop(9%,#7d7e7d), color-stop(99%,#0e0e0e)); /* Chrome,Safari4+ */
    background: -webkit-linear-gradient(top,  #7d7e7d 6%,#7d7e7d 9%,#0e0e0e 99%); /* Chrome10+,Safari5.1+ */
    background: -o-linear-gradient(top,  #7d7e7d 6%,#7d7e7d 9%,#0e0e0e 99%); /* Opera 11.10+ */
    background: -ms-linear-gradient(top,  #7d7e7d 6%,#7d7e7d 9%,#0e0e0e 99%); /* IE10+ */
    background: linear-gradient(top,  #7d7e7d 6%,#7d7e7d 9%,#0e0e0e 99%); /* W3C */
    filter: progid:DXImageTransform.Microsoft.gradient( startColorstr=&#39;#7d7e7d&#39;, endColorstr=&#39;#0e0e0e&#39;,GradientType=0 ); /* IE6-9 */
     
    border-bottom:2px solid #999;
     
    color:#fff;
    text-align: center;
    margin:-12px auto;
    padding-bottom:1px;
    border-top: 1px solid #333;
    height:38px;
    font-size:13px;
    position:fixed;
    vertical-align: baseline; overflow:hidden;
    z-index:999;
    width:100%;
    border-bottom-left-radius:6px;
    border-bottom-right-radius:6px;
    display:block;
    font-weight: bold;
    font-family: arial,&quot;Helvetica&quot;;
    font-color:#fff;
     -moz-box-shadow: 0 2px 4px hsla(0,0%,0%,.35);
     -webkit-box-shadow: 0 2px 4px hsla(0,0%,0%,.35);
    }
    #ut-sticky:hover
    {
     
    background-color:#333;background-image:-moz-linear-gradient(top,#555555,#434343);background-image:-ms-linear-gradient(top,#555555,#434343);background-image:-webkit-gradient(linear,0 0,0 100%,from(#555555),to(#434343));background-image:-webkit-linear-gradient(top,#555555,#434343);background-image:-o-linear-gradient(top,#555555,#434343);background-image:linear-gradient(top,#555555,#434343);background-repeat:repeat-x;filter:progid:DXImageTransform.Microsoft.gradient(startColorstr=&#39;#555555&#39;,endColorstr=&#39;#434343&#39;,GradientType=0)
     
    -webkit-transition:all 1.3s ease-in-out;-moz-transition:all 1.3s ease-in-out;-o-transition-duration:all 1.3s ease-in-out;transition:all 1.3s ease-in-out;
     
     -moz-box-shadow: 0 2px 4px hsla(0,0%,0%,.35);
     -webkit-box-shadow: 0 2px 4px hsla(0,0%,0%,.35);
     
    }
     
    #ut-button {background:#fff; padding:4px; color:black;text-shadow:0 -1px 0 rgba(255,255,255,0.25);background-color:white}
     
    #ut-sticky p{line-height:5px; font-size:13px; text-align:center; width:95%; float:left;}
    #ut-sticky p a{ text-decoration:underline; padding:4px; color:#FFFF33;}
    .ut-cross{display:block; position:relative; right:15px; top:4px;float:right;}
    .ut-cross a{font-size:18px; font-weight:bold; font-family:&quot;Arial&quot;; color:#FF0000; line-height:30px;}
    .ut-cross, a:hover{color:#DDD; text-decoration:none;}
     
    </style>
    <div id='ut-sticky'>
    <p style='padding-top:17px;'>Add This Floating Notification Bar To Your Blog <a class='ut-button' href='http://www.allbloggingtips.com' target='_blank'>Click Here!</a></p>
    <div class='ut-cross'><a href='javascript:hide_cross();'>X</a></div>
    </div>
    <script language='JavaScript'>
    function hide_cross() {
    crosstbox = document.getElementById(&quot;ut-sticky&quot;);
    crosstbox.style.visibility = &#39;hidden&#39;;
    }
    </script>
    <br/><br/>
    <br/><br/>
    <!-- End of Notification code, info - http://www.allbloggingtips.com -->


    To Customize it
    After adding above code just edit above HIGHLIGHTED text and link to your desire text.

    I hope you enjoyed this cool Floating Notification bar widget. Do let me know if you face any problem.


    Add to Cart View detail

    How to Hide Widgets Gadgets in Blogger


    By default your widgets/gadgets will show on every page in your Blogger blog. If you don´t want that you can use this neat little tweak to dictate the page(s) the gadgets will display on.

    I used to use a code similar to the one you will find on other tutorial sites with this same tweak, but then I noticed a flaw in that method. The problem was that, even with the tweak applied correctly, a small amount of the gadget still remained. Although the problem was only noticeable in some of the templates, I decided to change the tweak to remedy this. My method is a little more complex then other methods but it is the only way I could find to fully remove the gadgets.

    1. Locate The Widget/GadgetID# (Remember this for later) [For instructions on how to do this go to the bottom of this article.]

    2. Go to Design --> Edit HTML.

    3. Search for (Ctrl+F) 

      </head>


    4. Just above the </head> tag in your template place your Conditional Tags codes.

    5. Depending on the condition you used, the code you created will look something like this: (In this example we will dictate the styles only on the homepage.)


    <b:if cond='"data:blog.url == data:blog.homepageUrl"'>
    <style>
    <--CSS rules to be displayed on homepage only -->
    </style>
    </b:if>


    6. Replace the blue text with the following code:

    #Widget/GadgetID# {
    display: none;
    position: relative;
    bottom: 99999px;
    }


    7. Replace the red text with the Widget/GadgetID# you attained in section 1.

    When you´re done it should look something like this:

    <b:if cond='"data:blog.url == data:blog.homepageUrl"'>
    <style>
    #HTML1 {
    display: none;
    position: relative;
    bottom: 99999px;
    }
    </style>
    </b:if>


    There is only one small issue with doing it this way. If you´re using a homepage conditional tag then it will remove the gadget from your Page Elements as well. You can however edit the gadget if you need to from the tools on your site on the pages it still displays on.

    Even with this method you may end up with a little spacing issue from the gadget directly below the one that is no longer displayed In most cases this is unnoticeable and not a problem. If you do want to remove this as well then keep on reading.

    To remove the spacing issue you just need to add in a CSS rule for the gadget below it as well.


    Optional Steps:
    1. Locate the Widget/GadgetID# for the gadget directly below the gadget you just hid.

    2. Place the colored code into the code you just made. This needs to be done exactly as shown below:

    <b:if cond='"data:blog.url == data:blog.homepageUrl"'>
    <style>
    #HTML1 {
    display: none;
    position: relative;
    bottom: 99999px
    }
    #Widget/GadgetID# {
    margin-top: -10px;
    }
    </style>
    </b:if>


    3. Replace the orange code with the Widget/GadgetID# you just attained in section 1 of the optional steps.

    P.S.: You may have to adjust the green text to get the spacing just right.

    How to Locate Widget/Gadget IDs

    A. Go to Design --> Page Elements.

    B. Click the Edit Option on the Widget/Gadget.

    C. Once the Widget/Gadget Opens you should see something like this:


    The section in red is the Widget/Gadget ID#.

    For the gadget here the ID is LinkList1.

    This is case sensitive, so copy it just as you see it.

    That´s all!

    Good luck!

    Add to Cart View detail

    Saturday, August 11, 2012

    How to Make Paypal Donation Button


     Donation button function is to donor money to the blogger from the loyal readers / loyal visitors. Here the blogger /the writer will get the money from the visitors who donor their money. the procedure to make the donation button are below: 1. Go to http://www.paypal.com ( if you dont have account here, sign up first) but if you have, just sign in to your account2. click "merchant service" like show in the picture


    3. Scroll down and click donation


    4. fill the fields with your data > create button5. Copy the code to your blog > page elements > add gadget > add HTML Code > paste the code


    6. Click add gadget > add HTML Code > paste the code


    7. Now you have donation button in your blog.


    Add to Cart View detail

    How to create a " Contact Form" for Blogger


    If you have subscribed to comments yesterday, you might have seen Bonoriau’s comment:

    Can you teach me how to add a contact form to blogs?
    So, here is the answer.

    Many bloggers have already used several sites for contact form building and they have posted in-depth tutorials for this. You will be able to find quite a few of them yourself. Here is my addition.

    A contact form is indeed essential for a professional blog. A sign that the blog is professional. There are a number of services, which allow you to paste a customized contact form to your own blog. Here are some of them.

    Part I: Free Contact Forms

    There are a number of free online contact form builders, which have pretty much built in templates for contact forms. In this first part, we will see some of them.

    1. EmailMeForm

    This is my choice for professional contact forms. You can do pretty much great customization with this application. Go to emailmeform.com and sign up. You can start a new contact form after signing up and you can add fields to it the way you like.

    You can have this form hosted on your Blogger blog itself by publishing the form HTML code provided by them as an individual post or host it in their server itself as I have done. Make sure you disable comments and trackbacks on this post. You can choose a Thank You page and it may be redirected to your blog as I have done here.

    2. Kontactr

    Kontactr has been one of the most popular contact form providers for blogs for pretty much some time. I don’t know why, but now the site gives me a 403 forbidden error.

    3. Contactify

    Just as the others, Contactify helps you build very professional contact forms, which can be added to your blog.

    4. MyContactForm.com

    MyContactForm.com is another professional contact form builder with quite a number of features including field validation, templates, autoresponders, etc. However, the premium features are available at a payment here.

    Part II: Build Your Own Personal Professional Contact Form With ZOHO

    ZOHO is a tight competitor for Google Docs and one of the best. Here are the steps to building a contact form using ZOHO Creator.

    1. Start New Application

    Go to ZOHO Creator and sign in using your Google account. Now, click, Start New Application link, and you will be directed to the page like this:


    Choose the form name. You can choose form templates, which will give you professional designs. Make sure you make the application public as in the screenshot, for all people to access the form.

    2. Add Fields

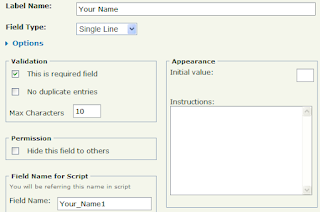
    In the next step, you can add pretty much any sort of fields to the contact form as you wish. Add name, email, subject, message fields, and any other fields as you choose.

    If you know scripting, you can have cool effects on these fields.


    You can edit the field properties with the edit link available by hovering over the respective field. Check this screenshot:


    3. Captcha for Spammers

    You may want to enable Captcha (image of numbers and letters) in your form to fight the spammers. There are people who use automated ways to contact you if you have a popular blog. So, to avoid these spams, use a captcha. In order to use Captcha, click Form Properties from More Actions menu. Check the box, Need Verification Code. Also you can set the ‘Thank You’ message here.

    4. Email Notification Settings

    This is the most important step. You have to set email notification to the form so that every time someone submits it, you get the message to your inbox. From the More Actions menu, click Email Notification.

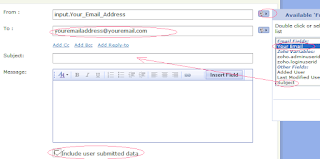
    By default, the window that opens is like this:


    In the screenshot, see the marked regions. For the From field, using the Write Expression button, choose the field name for the user’s email address. This way, you can get the email as being sent directly from the user’s email address and you can reply him directly with the reply button.

    In the To field, type your own email address (if ZOHO doesn't allow this, use the admin user ID field there). Also, you may want to choose the subject field with the name you have given to the subject field on your form, which is also shown on the Write Expression window (marked). Don’t also forget to check the Include User Submitted Data check box. Otherwise, you will not get the user’s actual communication. In the message box, you can enter anything, which will be sent along with the user communication.

    You can alternatively set up the email notification using the scripting menu (for advanced users).

    5. Set Up the Contact Form on Your Site

    Once you are finished with editing the fields, design and email notification settings, you need to make the form available to your readers. Click on the Access This Application link.

    Check the appropriate contact form application and click More Actions menu. You can find Embed in Your Website link. Alternatively, you can use the permalink to host the form within ZOHO itself. Give the link to your contact form in your website and enjoy.

    Create your Contact Page
    In your Blogger dashboard, create (or edit) a "contact" page in which you would like to embed your contact form.

    Add an introductory paragraph or any other content you like, then switch to "Edit HTML" mode before pasting your Kontactr code.

    You can preview your page if you like and the contact form will show up in the area where you pasted the Kontactr HTML code.

    On slower connections, it may take a few seconds for the contact form to show up. This is because your contact form is rendered in an iframe (rather than within the page content), and also because CAPTCHAs are in place to deter spammers.
    If you have any more doubts, please feel free to contact me.
    Add to Cart View detail

    Submit site/blog to Google, Yahoo and Bing search engines

    If your blog has not yet been indexed by the three major search engines (Google, Yahoo and Bing), then it’s time to stop waiting and be proactive -submit your blog to them! Submission will increase your blog chances of being indexed the next time they crawl the web. Submission is free and is very easy to do.

    Checking whether your blog is indexed

    Before submitting your blog, you might want to do a “site search” to check its status (whether your blog is indeed has not been indexed yet). Enter this search query in the search box:

    site:domain

    Replace domain with your domain name, for example for a blogspot blog enter site:yourblogname.blogspot.com.

    If the search produces no results, then go ahead with the submission. (If your blog has already been indexed, this search will return a list of all your indexed blog pages).

    Use the same query for all three search engines.

    Now let’s start submitting:
     Submit blog to Google

    1. Go to Google site submission page.

    2. Fill in your blog homepage url and enter comments (optional).

    3. Enter the captcha, then click Add URL button.


    Submit blog to Yahoo!
    Update 2012: Yahoo Site Explorer has merged into Bing Webmaster Tools. Submitting your blog to Bing will cover both Bing and Yahoo.

    1. Go to Yahoo Site Explorer Website submission page.

    2. Sign in with a Yahoo ID.

    3. Click on Submit a Website or Webpage link.

    4. Enter your blog url (the homepage’s url) and click Submit URL button.

    Note: You can also submit individual webpages (post pages) if you discovered certain pages are left out from Yahoo search index.

    3. Submit blog to Bing

    1. Go to Bing URL submission page.

    2. Enter the captcha.

    3. Enter your blog homepage URL and click Submit URL button.

    Now having submitted your blog to the search engines, you might also want to submit it to DMOZ (Open Directory Project).

    Enjoy!
    Add to Cart View detail

    Blogger Auto Read more with thumbnail


    Expandable post or popularly known as “read more” is a feature that make your blog shows only a part of your posts on index pages i.e. home, labels and archive pages. At the end of each preview there will be a link to the post page, usually attached to the phrase “read more”.
    Not too long ago I wrote a tutorial on how to make a “conventional” read more, this time around we will make an auto read more with thumbnail. Before we go on, let me highlight the differences between conventional and auto read more.

    (Blogger’s own read more -the jump break, can be classified as conventional read more)

    Conventional read more
    Auto read more with thumbnail
    Uses HTML
    Javascript
    Need to insert code in post.
    Post is untouched.
    Length of each snippet can be customized.
    Length can be changed, but it affects all posts.
    Read More is applied only to posts with the code added.
    Read More applied to all posts, no exception.
    No thumbnail. To show picture, you must place the picture inside the snippet (at the beginning of post).
    The first picture in each post will be used as a thumbnail. You can also choose not to show thumbnail.
    The code loads full post but only shows the snippet.
    Only loads the snippet.
    Applying auto read more

    Here we go:
    1. Login to your Blogger account.
    2. Go to Dashboard > Design > Edit HTML.
    3. Back up your template.
    4. Check the Expand Widget Templates check box on top right of the HTML window.
    5. In the code window, look for </head> line.
    6. Add the Read More code below right after that line.
    <!-- Auto read more script Start -->
    <script type='text/javascript'>
    var thumbnail_mode = "yes"; //yes -with thumbnail, no -no thumbnail
    summary_noimg = 430; //summary length when no image
    summary_img = 340; //summary length when with image
    img_thumb_height = 200;
    img_thumb_width = 200;
    </script>
    <script type='text/javascript'>
    //<![CDATA[
    function removeHtmlTag(strx,chop){
    if(strx.indexOf("<")!=-1)
    {
    var s = strx.split("<");
    for(var i=0;i<s.length;i++){
    if(s[i].indexOf(">")!=-1){
    s[i] = s[i].substring(s[i].indexOf(">")+1,s[i].length);
    }
    }
    strx = s.join("");
    }
    chop = (chop < strx.length-1) ? chop : strx.length-2;
    while(strx.charAt(chop-1)!=' ' && strx.indexOf(' ',chop)!=-1) chop++;
    strx = strx.substring(0,chop-1);
    return strx+'...';
    }

    function createSummaryAndThumb(pID){
    var div = document.getElementById(pID);
    var imgtag = "";
    var img = div.getElementsByTagName("img");
    var summ = summary_noimg;
    if(thumbnail_mode == "yes") {
    if(img.length>=1) {
    imgtag = '<span style="float:left; padding:0px 10px 5px 0px;"><img src="'+img[0].src+'" width="'+img_thumb_width+'px" height="'+img_thumb_height+'px"/></span>';
    summ = summary_img;
    }
    }
    var summary = imgtag + '<div>' + removeHtmlTag(div.innerHTML,summ) + '</div>';
    div.innerHTML = summary;
    }
    //]]>
    </script>
    <!-- Auto read more script End -->

    7. After that, find this line:
    <data:post.body/>

    8. Replace the line with this code:


    <!-- Auto read more Start -->
    <!-- http://www.BloggerSentral.com -->
    <b:if cond='data:blog.pageType == &quot;item&quot;'>
    <data:post.body/>
    <b:else/>
    <b:if cond='data:blog.pageType == &quot;static_page&quot;'>
    <data:post.body/>
    <b:else/>
    <div expr:id='&quot;summary&quot; + data:post.id'><data:post.body/></div>
    <script type='text/javascript'> createSummaryAndThumb(&quot;summary<data:post.id/>&quot;);
    </script>
    <a class='more' expr:href='data:post.url'>Read more ...</a>
    </b:if>
    </b:if>
    <!-- Auto read more End -->
    9. Click Preview. If it works, then click Save Template. 

    Customizing the snippet

    You can customize the read more by changing the values of the variables below:

    1. thumbnail_mode –set to “yes” if you want to show thumbnail with text summary. Set to other than “yes” to show only text summary.

    2. summary_img –specify the number of characters (including spaces) you want to show in the summary, with thumbnail.

    3. summary_noimg –specify the number of characters (including spaces) you want to show in the summary, when there is no thumbnail.

    4. img_thumb_height and img_thumb_width -specify the thumbnail height and width (in pixels).

    5. You can change the words “Read more” with your own by changing it in line 12 of the code in step 8.

    That’s it, enjoy!

    Before you leave:

    § Do you find this article useful? Share it via Retweet, Share or Stumble buttons below.

    § Any suggestion, question or comment? Please post it in the comments below.


    Add to Cart View detail

    Download

    Most View Product

    Contact Online

    Related Posts Plugin for WordPress, Blogger...
    Support : Creating Website | Johny Template | Mas Template
    Copyright © 2012. tech-guru-tips - All Rights Reserved
    Template Created by Creating Website Published by Mas Template
    Proudly powered by Blogger